


APPLIANCE HELP & TIPS
this is your source for appliance knowledge.
RANGE
Will the cooktop turn on?
Some ranges may be equipped with Cooktop Control Lock. Look for “Control Lock” on the range control console, then reset by, typically, pushing and holding for 3 seconds. To locate the Cooktop Control Lock feature for your particular model (certain models), look in the Table of Contents in your Use & Care Guide.
If the gas cooktop operates, the gas regulator shut-off valve may not be open.
Is the display showing a letter followed by a number?
Press OFF to clear the display. If the message reappears, then reset the household circuit breaker(s) that controls the appliance for 1 minute. If the message reappears, call for service.
Is the power cord plugged in?
Plug power cord into a grounded outlet with a dedicated circuit (240V receptacle for electric ranges, 120V receptacle for gas ranges).
Has a household circuit breaker(s) tripped or fuse(s) blown?
Reset power to the product:
Power unit down by turning off the circuit breaker(s) for one (1) minute.
Power unit up by turning on the circuit breaker(s).
Monitor the oven for one (1) minute to ensure the error code does not display again.
Verify oven operation.
If the problem continues, contact a qualified electrician.
WALL OVEN
Do the oven control panel buttons accept input (numbers display or change with temperature adjustment)?
Some ovens may be equipped with Control Lock. Look for “Control Lock” on the oven control console, then reset by, typically, pushing and holding for 3 seconds. To locate the Control Lock feature for your particular model, look in the Table of Contents in your Use & Care Guide.
Is the display showing a letter followed by a number?
Press OFF to clear the display. If the message reappears, then reset the household circuit breaker(s) that controls the appliance for 1 minute.
If the message reappears, call for service.
Has a household circuit breaker(s) tripped or fuse(s) blown?
Reset power to the product:
Power unit down by turning off the circuit breaker(s) for one (1) minute.
Power unit up by turning on the circuit breaker(s).
Monitor the oven for one (1) minute to ensure the error code does not display again.
Verify oven operation.
If the problem continues, contact a qualified electrician.
If you hear a humming noise, fret not. The cooling fan may be operating or running. The oven is equipped with an automatic cooling fan that runs when the oven is in use and/or after a cycle completes. It’s normal for the automatic cooling fan to run when the oven is in use and/or after the cycle completes. It’s also normal to hear the automatic cooling fan move air when the oven is in use and/or cycle completes. The automatic cooling fan helps to cool the enclosed oven cavity and the electronic controls when the oven is in use and/or after the cycle completes. It also helps keeps the electronic controls cool during every oven function such as BAKE, BROIL or CLEAN.
Note: In many wall ovens, if the oven door is left open to cool the oven, the cooling fan will not shut off.
Humming or Fan Noise in a convection oven
It is normal for the convection fan to operate during preheat when using non-convection functions. You may also hear the convection fan operating or cycling in ANY cooking function. The reason the convection fan runs is to provide better baking and cooking performance. The convection fan may cycle on/off for short intervals during preheat, depending on model, to optimize preheat times and provide uniform oven temperature. It may also run or cycle in ANY cooking function, besides just a convection cycle. This does not change cooking time on non-convection functions.
The convection ovens that may experience this noise include:
ANY gas or electric freestanding range or wall oven with convection.
ELECTRIC convection fan turns on immediately.
GAS convection fan turns on after approximately 5 minutes to allow proper burner flame establishment.
Typically, the fan operates during preheat for both non-convection and convection functions. It then turns off when the oven door is opened.
During preheat or when convection cycle is selected, the convection fan will come on:
ELECTRIC convection fan turns on immediately.
GAS convection fan turns on after approximately 5 minutes to allow proper burner flame establishment.
If the door locked when starting the oven:
Press Cancel/Off key to start a latch reset, wait 20-30 seconds and open door, or turn the power off at the circuit breaker or fuse box for one minute, then turn the power back on.
If the oven has a manual latch handle:
Allow the oven to cool, approximately 30-90 minutes, move the latch arm to the left to unlock the door. If the latch arm will not move after cooling to room temperature, or is stuck in between full right and full left positions, schedule service.
Is the oven door locked due to power failure during Self-Clean?
If power was interrupted during a Self-Clean cycle, and the cycle did not resume, select the “Self Clean” option, then select “Cancel”. Wait a couple of minutes then try to start the cycle again.
If the oven clean cycle was started by mistake:
Press Cancel/Off key. The oven will need to cool to approximately 200F(95C) before the oven door will open.
Do you see an Error Message?
Follow directions in the display, refer to the Error Code Symptom, or:
Reset power to the product:
Power unit down by turning off the circuit breaker(s) or fuse(s) for one (1) minute.
Power unit up by turning on the circuit breaker(s) or fuse(s).
Monitor the oven for one (1) minute to ensure the error code does not display again.
Verify oven operation.
Preheat time of 12-15 minutes (+/-) 5 minutes is normal:
Ovens with all racks in will preheat to 350°F in 12-15 minutes.
Insert food when preheat tone sounds for best cooking results.
Factors that cause longer preheat times:
Unused racks left in the oven will add to the preheat time. Remove any racks not being used for oven operation.
For optimal performance, place food in the oven as soon after the signal as possible. Avoid leaving the door open for an extended period of time.
A current model range/wall oven has a larger oven cavity than past models and will take longer to preheat.
A hidden bake element provides a buffered heat and will take longer to preheat than an exposed bake element.
A range/wall oven installed on lower voltage, 208V, will take longer to preheat than one installed on 240V. If you live in a building that has an elevator, the oven is installed on 208V and it will take longer for the oven to preheat. Oven performance will not be affected once the set temperature is reached.
Low/cold room temperature will cause longer preheat times.
Pre-heat option for faster preheat (select models only):
Select ovens feature a faster preheat option that preheats the oven faster saving time and energy using all of the oven elements and a fan, the oven heats up more quickly and creates the ideal temperature for single rack baking. If you would like to download or view product literature for your appliance, please visit our Manuals and Literature page.
NOTE: The Error Code may display in F# E# format or E# F# format.
There may be a simple issue with the product that can be resolved by turning the power off and on.
Power the unit down by turning off the circuit breaker(s) or fuse(s) for one (1) minute and then power the unit up by turning on the circuit breaker(s) or fuses(s),
Monitor the the product for one (1) minute to ensure the error code does not return.
Error Code/Display
F9 or F9 E0:
The electrical outlet in the home or the electrical connection to the appliance may be miswired.
If your appliance was installed recently (within approximately 3 months), contact a qualified electrician to verify the electrical supply.
Unexpected power supply line “noise” during a power outage that the control detected as incorrect voltage may cause the code to display.
If any keys were pressed before a 10 second delay during power up could cause the code to display.
Resolution: Reset Power.
“C”:
Oven is displaying in Celsius instead of Fahrenheit.
Resolution: Refer to your Use & Care Guide for specific information on changing from Celsius to Fahrenheit.
The oven will not heat above 260 degrees on the display if in Celsius.
Clock is blank:
Some models have a hidden feature which allows you the option to hide the time of day on the display window.
Resolution: Press and hold Clock Set/Start for five seconds(typical). This will time of day back to display. The time should not have to be reset.
Refer to your Use & Care Guide for specific information.
“CAL”:
Oven calibration feature – This function allows you to calibrate your oven.
Resolution: Refer to your Use & Care Guide for specific information.
LOC, Lock, Locked:
Control Lock has been activated.
Resolution: Refer to your Use & Care Guide for specific information
SAB, Sab, 5AB, or 5A6
Your product has the Sabbath Mode feature activated.
Resolution: Refer to your Use & Care Guide for specific information on entering and exiting Sabbath Mode.
PF or PF id=27 or PF id=30:
There has been a power failure.
Resolution: Press the cancel pad to clear the display. On some models you may need to reset the time of day clock.
Time of day is flashing:
There has been a power failure.
Resolution: Press the cancel pad to clear the display. On some models you may need to reset time of day clock
Many dishwashers today have a filter instead of a food chopper (that’s what makes them so quiet!). To keep your dishwasher clean and odour-free, change your filter monthly.
Have you cleaned the dishwasher?
Don’t just clean the dishes — take the time to ensure the dishwasher interior is clean too. When it’s time to clean the dishwasher, keep in mind the following cleaning tips for dishwashers.
Extremely hard water mineral deposits can cause damage to your dishwasher and make it difficult to achieve good cleaning. A water softener is strongly recommended if your hardness is 15 grains or more.
If a water softener is not installed, try the following:
Use affresh® Dishwasher Cleaner or a white vinegar rinse to remove white spots and film. Depending on the severity of the spots more than one treatment may be required.
Follow instructions on the affresh® Dishwasher Cleaner package.
affresh® cleaners are available at many retailers. Find one here.
or
Use a white vinegar rinse:
Put 2 cups (500 mL) white vinegar in a glass or dishwasher-safe measuring cup on the bottom rack.
Run the dishwasher through a complete washing cycle using an air-dry or an energy-saving dry option. Do not use detergent. Vinegar will mix with the wash water.
NOTE: Vinegar is an acid, and using it too often could damage your dishwasher. It’s better to do so only when you need to deeply cleanse your dishwasher.
Was rinse aid used?
Your dishwasher is designed to use rinse aid for good drying performance. Without rinse aid, your dishes and dishwasher interior will have excessive moisture. The Heat Dry and ProDry™ options will not perform as well without rinse aid. Rinse aid improves drying and reduces water spots and filming. Water “sheets” off dishes rather than forming water droplets that cling and leave spots.
Is the dishwasher new?
It could take up to 2 weeks of regular usage for the new dishwasher to reach optimal drying performance.
Were the controls set correctly? Was a heated or quick dry cycle selected?
Use the Heat Dry or ProDry™ options for best drying performance. When selecting a “quick” wash or “1 Hour” wash cycle you need to make sure the Heat Dry or ProDry™ option is selected to provide a dry program. If your dishwasher has a “high temp” option, select the option for optimal drying performance.
Heat Dry will be on by default when selecting a soil cycle. To use the ProDry™ option, touch the ProDry™ button until the light turns on
Is the water temperature too low?
For best results, the water should be 120°F as it enters the dishwasher. Proper water temperature helps the dishes dry effectively.
Were items loaded correctly?
Load items at an angle. This is very important, especially for plastic items. For improved results, place items on the more slanted side of the rack.
Is the heating element working properly?
– Run a cycle with the Sani Rinse option selected. If the Sani LED is on steady (not blinking), there is no problem with the dishwasher’s heating element. If the Sani LED is blinking (not on steady), there may be a problem with the dishwasher’s heating element.
Were items loaded correctly?
Loading a dishwasher is the first step to using the appliance properly. It will not turn on if there are problems with correctly shutting the dishwasher door. You may need to re-organize your dishes or load fewer dishes. Here are a few tips and tricks to loading the dishwasher safely and properly.
Load items at an angle. This is very important, especially for plastic items. Also, some water may be left in the bottom of concave cups and mugs.
Plastics are difficult to dry because they have a porous surface and tend to collect droplets. Plastic items take longer to dry and may not dry completely in a normal dry cycle, so let them air dry.
We recommend using the upper rack for bowls and cups.
We also recommend using the lower rack for plates, cups, and utensils
Ensure all cups are face-down.
Ensure all plates are slotted into the rack on their side.
Load items at an angle. This is very important, especially for plastic items. Also, some water may be left in the bottom of concave cups and mugs. See below for loading information.
Plastics are difficult to dry because they have a porous surface and tend to collect droplets. Plastic items take longer to dry and may not dry completely in a normal dry cycle.

Was rinse aid used and is the dispenser full?
Your dishwasher can utilize rinse aid to assist drying performance. Without rinse aid, your dishes and dishwasher interior could have excessive moisture. The heat dry option can perform better with rinse aid. Rinse aid can improve drying and reduces water spots and filming. Water “sheets” off dishes rather than forming water droplets that cling and leave spots. Rinse aid can be helpful even when using dishwasher detergent packets.
We recommend using the rinse agent dispenser to dispense rinse aid. Be sure to fill the dispenser before you use your new dishwasher. A full dispenser holds about 5 oz (150-175 mL) or rinse aid and should last about a month. Make sure the rinse aid dispenser is full. It is recommended to use a colored rinse aid, such as blue, so that you can more easily see the rinse aid level in the gauge.
To use rinse aid:
Follow the steps below for the style of dispenser in your dishwasher.
Dispenser Style 1:
Make sure the dishwasher door is fully open.
Turn the dispenser knob to “Open” or “Refill” and lift it out.
Pour rinse aid into the opening until the indicator points to “Full.” Take care not to overfill.
Clean up any spilled rinse aid with a damp cloth.
Place the knob back into the opening and turn to the “Lock” position.
When the rinse aid indicator drops to the “Add” level, add more rinse aid.
Rinse aid setting
The amount of rinse aid released into the final rinse can be adjusted.
The factory setting is at 2 or 3; if you are experiencing drying issues, adjust to the highest setting.
If there are rings or calcium (hard water) spots on dishes, try a higher setting.
To adjust the setting
Remove the dispenser knob.
Turn the arrow adjuster inside the dispenser to the desired setting by either using your fingers or inserting a flat-blade screwdriver into the center of the arrow and turning.
Replace the dispenser knob.
Dispenser Style 2:
Make sure the dishwasher door is fully open.
Open the rinse aid dispenser lid by gently pushing in the center of the lid with your thumb and pulling up on the edge.
Pour rinse aid into the opening until the indicator points to “Full.” Take care not to overfill.
Clean up any spilled rinse aid with a damp cloth.
Close the dispenser by pushing down gently on the lid.
When the rinse aid indicator drops to the “Add” level, add more rinse aid.
Rinse aid setting
The amount of rinse aid released into the final rinse can be adjusted.
The factory setting is at 2 or 3; if you are experiencing drying issues, adjust to the highest setting.
If there are rings or calcium (hard water) spots on dishes, try a higher setting.
To adjust the setting
Open the rinse aid dispenser lid by gently pushing in the center of the lid with your thumb and pulling up on the edge.
Turn the arrow adjuster under the dispenser lid to the desired setting.
Close the dispenser by pushing down gently on the lid.

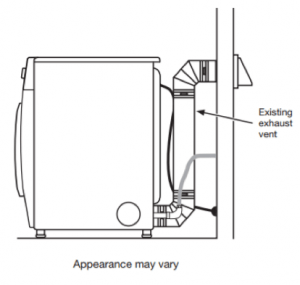
Is the exhaust vent or outside exhaust hood clogged with lint and restricting air movement?
A clogged exhaust vent system slows moist air from leaving the dryer and extends drying time. Run the dryer for 5-10 minutes. Hold your hand under the outside exhaust hood to check air movement. If the air movement is less than a hair dryer on high speed, clean the lint from the entire length of the system and the exhaust hood.
Replace any plastic or metal foil vent with rigid or flexible heavy metal vent.
Lint should be removed from the entire length of the system at least every 2 years, depending on dryer use.
Make sure that the outside exhaust hood is free of debris and that the louvers or flapper door easily open and close. Box or louvered hoods are recommended.
Is the exhaust vent kinked, smashed or crushed?
Kinked or crushed exhaust vent material slows moist air from leaving the dryer and extends drying time. Replace any plastic or metal foil vent with rigid or flexible heavy metal vent. The dryer vent should be installed 4″ away from the wall.
Watch this video on how to check for crushed vent material.
Is the dryer in a new location or is this a new installation? Is there a new exhaust vent system?
The exhaust vent system may be too long or have too many turns. Heavy rigid metal vent material and boxed or louvered exhaust hoods allow for the longest exhaust vent systems. Use the fewest number of elbows for the best airflow. Your installation should not have more than 4 elbows. Each additional elbow in the system reduces the amount of vent material length the system can have for good air movement. See the Installation Instructions for more details on maximum exhaust vent system lengths.
The vent system chart below provides venting requirements that will help achieve best drying performance.

Replace any plastic or metal foil vent with a rigid or flexible heavy metal vent.
Use only 4″ diameter heavy metal exhaust vent material. Larger or smaller diameter material will reduce good air movement and cause longer drying times.
Detergent dispenser drawers in washing machines need to be cleaned from time to time to remove residue and help to ensure proper function. To clean the dispenser housing area, use mild soap and water and a soft cloth or sponge. If needed, use a small soft brush to clean inside the dispenser. Replace the inserts and return the dispenser drawer to the housing. Keeping the drawer slightly open when not in use will allow the drawer to dry completely and reduce residue from building up. #ProTips
Air Flow (vent to the outside) is Important
Air flow is crucial to dry clothing. As a wet load of laundry is tumbled in a dryer, the wet items and hot air produce moisture. In order for the clothes to dry, this moisture has to exit the dryer to complete the drying process. If the moisture is not vented and allowed to leave the dryer in some way, dry times could be extended dramatically. Venting must run from the dryer to the outside of the home, free of obstructions and any blockages.
Symptoms of a Blocked Vent
There are many things that may indicate your house venting could be restricted. Following are the most common signs:
- Long Dry Times – The most common indicator of house venting being restricted is longer than normal dry times. Because the hot, wet air cannot leave the dryer as easily, the clothing can still be damp at the end of a cycle. It could take multiple cycles to get a load of clothing dry when the vent is blocked or restricted.
- Dryer is very warm to the touch – Because the heat stays inside the dryer, the outside of the dryer could feel very warm to the touch, especially on the sides and near the bottom.
- Steam/Moisture in the dryer – Moisture and heat together will produce steam, similar to a sauna. If the vent is restricted, the steam will remain inside the dryer. You may notice steam on the door (if you have a glass door), or when opening the door. If your dryer has an electronic display, you may also see the display steaming over.
- Water dripping on the floor – Because the moisture inside the dryer is not being released to the outside, it may accumulate inside the dryer, or inside the venting material. This may cause water puddles on the floor, usually behind the dryer. You may think the dryer (or even the washer) is leaking water on the floor.
- Lack of lint on the Lint Screen – Because there is little air movement, the lint from the clothing does not get removed and on to the inside lint trap (screen). You may see very little lint accumulating, and only at the bottom of the lint screen. You may also see lint building up around the dryer door, or on the clothing.
- No air movement – If your lint screen is located on the top of your dryer, this is easy to check: pull out the lint screen, and set the controls to “Air Dry” or “Air Fluff.” Start the dryer, and place your hand inside the lint trap area. If you feel air movement, your house venting is probably clear. However, if you feel little to no air movement, your house venting is probably restricted.
This Washer Maintenance Procedure should be performed, at a minimum, once per month or every 30 wash cycles, whichever occurs sooner, to control the rate at which soils and detergent may otherwise accumulate in your washer.
Have you run a monthly washer maintenance cycle?
- Run the Clean Washer cycle every month to maintain washer freshness. This procedure helps keep odors from developing in your washer. The Clean Washer cycle uses higher water volumes in combination with affresh® washer cleaner or liquid chlorine bleach to thoroughly clean the inside of the washer.
- Unload washer as soon as cycle is complete.
Clean Washer Cycle
- This washer has a special cycle that uses higher water volumes in combination with affresh® Washer Cleaner or liquid chlorine bleach to clean the inside of the washer.
affresh® Washer Cleaner Cycle Procedure (Recommended for Best Performance):
- Open the washer lid or door and remove any clothing or items.
- Place an affresh® Washer Cleaner tablet in the bottom of the washer basket.
- Do not place an affresh® Washer Cleaner tablet in the detergent dispenser.
- Do not add any detergent or other chemical to the washer when following this procedure.
- Close the washer lid or door.
- Select the CLEAN WASHER cycle.
- Touch and hold the START/PAUSE button for 3 seconds to begin the cycle. The Clean Washer Cycle Operation is described below.
NOTE: For best results, do not interrupt cycle. If cycle must be interrupted, touch POWER. After the Clean Washer cycle has stopped, run a Rinse & Spin cycle to rinse cleaner from washer.
Chlorine Bleach Procedure (Alternative):
- Open the washer lid or door and remove any clothing or items.
- Add 1 cup (236 mL) of liquid chlorine bleach to the bleach compartment. NOTE: Use of more liquid chlorine bleach than is recommended above could cause washer damage over time.
- Close the washer lid or door.
- Do not add any detergent or other chemical to the washer when following this procedure.
- Select the CLEAN WASHER cycle.
- Touch and hold the START/PAUSE button for 3 seconds to begin the cycle. The Clean Washer Cycle Operation is described below.
NOTE: For best results, do not interrupt cycle. If cycle must be interrupted, touch POWER. After the Clean Washer cycle has stopped, run a Rinse & Spin cycle to rinse cleaner from washer.
Description of Clean Washer Cycle Operation:
- This cycle will fill to a water level higher than in normal wash cycles to provide rinsing at a level above the water line for normal wash cycle. Always remove all clothing items from washer before running the Clean Washer cycle.
- During this cycle, there will be some agitation, tumbling and/or spinning to increase the removal of soils.
- After this cycle is complete, leave the lid or door open to allow for better ventilation and drying of the washer interior.
Refer to your Use & Care Manual for specific procedures for your washer.
Recommendations to Help Keep Your Washer Clean and Performing at its Best
- Always use High Efficiency (HE) detergents and follow the HE detergent manufacturer’s instructions regarding the amount of HE detergent to use. Never use more than the recommended amount because that may increase the rate at which detergent and soil residue accumulate inside your washer, which in turn may result in undesirable odour.
- Use warm and hot wash water settings sometimes (not exclusively cold water washes), because they do a better job of controlling the rate at which soils and detergent accumulate.
- Always leave the washer lid or door open between uses to help dry out the washer and prevent the buildup of odour-causing residue.
Read these instructions completely before beginning the routine cleaning processes recommended below.
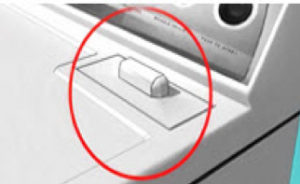
Is the Lint Screen Clean?
The lint screen will be located either on the top of the dryer or in the door opening of the dryer. A screen blocked by lint can increase drying time. It is important to clean your lint screen after every use.

Watch this video about cleaning the lint screen.
Is the exhaust vent or outside exhaust hood clogged with lint and restricting air movement?
Ample air flow must be permitted for proper dry time. Use the images below to troubleshoot and guide your vent cleaning.
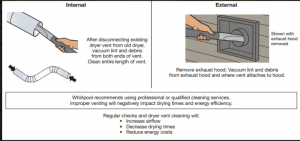
Watch this video about how to clean the exhaust hood.
A dryer vent test is available for dryers with top mounted lint screens. This vent test kit will help you to determine if the venting is restricted and needs to be cleaned. To order, contact Customer Service.
Watch this video on how the vent test kit works.
Is the vent crushed?
Rigid or Flexible metal venting is recommended for use on all dryers. Other material (aluminum foil, plastic) are NOT recommended because they can easily collapse or be crushed. See image below for examples of proper venting materials:

Difference between Auto Dry and Timed Dry
During Automatic Cycles, drying air temperature and moisture level are sensed in the load. This sensing occurs throughout the drying cycle and the dryer shuts off when the load reaches the selected dryness. Use the NORMAL dryness level to provide optimal energy savings.
With Timed Dry, the dryer runs the amount of time set and sometimes results in shrinkage, wrinkling, and static due to over-drying. Use Timed Dry for the occasional damp load that needs a little more drying time or when using the drying rack.
Were you drying a large load?
Large loads take longer to dry. A load that is too large for the dryer will not tumble and limits air movement in the dryer. This slows the process of removing moist air out of the dryer, which will result in longer drying cycles.
Still need help? Call or schedule service.
Are you using HE High Efficiency detergent?
Regular detergent creates too many suds for HE washers. The residue from the suds may appear as lint. Use only HE High Efficiency detergent.
Are you washing new clothing or linen items?
New clothes or linen items tend to create more lint in the first few washes. Washing new clothing inside out will help reduce the amount of lint in the cycle.
Was the laundry sorted?
Sort loads before laundering. Sort lint-producing fabrics (towels, chenille) from lint takers (corduroys, synthetics, permanent press). Also sort by color-lights with lights and darks with darks. Turn denim jeans and khaki pants inside out to wash.
Was tissue or paper left in pockets?
Always check all pockets and the interior of the washer prior to starting a new load of laundry. The lint may be caused by paper or tissues left in pockets.
Did you line dry the load of laundry?
You can expect some lint on your laundered items when line drying. The air movement and tumbling of a dryer removes lint from the laundry load.
Did you select a high-speed wash action cycle or a long wash time?
Cycles such as a heavy duty or Super Wash use high-speed wash action and long wash times for sturdy fabrics. Some loosely constructed fabrics, such as low-twist terry cloth towels, will produce more lint in cycles with higher-speed wash action. Choose cycles with less wash time and/or lower wash speeds to reduce lint.
Were you washing a large load?
The load must be balanced and not tightly packed. Load should move freely. Lint can be trapped in the load if the washer is tightly packed. Add only one or two items when the Add a Garment light is on. Wash smaller loads.
Did you use enough detergent?
Follow the detergent manufacturer’s directions. Use enough detergent to hold the lint in the water. Use only HE High Efficiency detergent in an HE machine.
Is your water colder than 60°F (15.6°C)?
Wash water colder than 60°F (15.6°C) may not completely dissolve the detergent. Always use the hottest wash temperature per the care label of the clothing being washed.
Use of non-HE detergent can cause a film residue. Use only HE detergent.
Always measure detergent and follow manufacturer’s directions based on load size and soil level.
Detergent works by attaching to dirt and oily particles and carrying them away. If there is not enough detergent for the soil level in the load or the water hardness, then soils can redeposit onto the load. Use more detergent for washing heavy soils in cold or hard water, following detergent manufacturer’s recommendations.
How much detergent should I use?
Use more detergent for washing heavy soils in cold or hard water, following detergent manufacturer’s recommendations. Moreover, always measure detergent and follow manufacturer’s directions based on load size and soil level. Older laundry detergents do not dissolve well in the washer, especially powdered detergent. Keep detergent containers closed to extend the shelf life. If you notice that your detergent is not always dissolving, replace with new detergent. Always use only HE High Efficiency detergent in your High Efficiency machine. Using non-HE detergent can cause over-sudsing, and cause longer cycle times, as the washer tries to eliminate the over-suds situation.
Watch this video on How High Efficiency (HE) Washers Work.
Clean your washer once a month using the Clean Washer cycle with affresh®, or another method per your Use and Care Guide. This will eliminate any detergent residue that may be left inside the washer.
NOTE: HE detergent can be used in non HE machines. You may not see as many suds as you would with regular detergent, but the cleaning will be the same. Use the manufacturer’s recommended amount on the box or bottle.
Did you know… you can reverse the door on your refrigerator? This allows you to customize it to best suit your needs! #ProTip
Your new refrigerator will probably make different sounds or noises than your previous refrigerator. Below is a list of common sounds the refrigerator might be making. Please click on each sound to learn more.
Buzzing: Water valve will make a buzzing or clicking sound if the ice maker is not connected to a water supply.
Chattering when dispensing: Water line may be kinked.
Grinding or Squeaking: Doors may be rubbing against cabinets or other surfaces when opening.
Gurgling: Refrigerant flowing through the tubes after a cooling cycle.
High-Pitched or Pulsating: Compressor fans adjusting to optimize performance.
Popping or Cracking: Contraction and expansion of the inside walls.
Rattling or Vibrating: Flow of refrigerant through cooling system, or water through the water line, items on the top of the refrigerator, refrigerator not level.
Sizzling, Hissing or Water Dripping: Water dripping on to the defrost heater during the defrost cycle.
Thumping or Hammering: Water line during a fill cycle.
Odd tasting water and/or ice can be caused by several things. The most common causes are:
New plumbing
Incorrect water supply line
Improperly stored food
New Plumbing:
New plumbing connections, such as PVC pipes and fittings, can cause discolored or off-flavored ice. Discard the first few batches of ice and flush additional water through the water dispenser.
Water Supply Line:
Verify that you are using one of the recommended water supply line:
Copper Water Supply Line
A Water Supply Line purchased from Whirlpool
Depending on the household water supply properties and the type of supply line used by the consumer, properties in the water may cause different types of supply lines to react in different ways; this has the potential to result in bad odor or taste in the refrigeration water and ice systems.
Food Storage:
Check for properly wrapped food. Ice and water absorbs odors.
Use airtight, moisture-proof packaging to help avoid odor transfer from stored food.
If the ice cubes have an odd taste or odor, throw them away. Allow 24 hours for the ice maker to produce more ice.
If your refrigerator is not cooling properly checking to make sure the controls are set properly. Below are some things you can quickly check. Look below for additional information on each topic.
Is the refrigerator turned on?
Is the cooling function turned on?
Are the controls set for the surrounding conditions?
Is the refrigerator turned on?
If the refrigerator is not cooling properly, check to make sure the refrigerator is turned on. Some refrigerators need to be manually turned back on after a power outage or power surge. The refrigerator could also accidentally be turned off during routine cleaning.
For Information on how to turn the refrigerator “Off” and “On”, please see your Use & Care Guide for specific information on your model.
If you would like to download or view product literature for your appliance, please visit our Manuals and Literature page.
Is the cooling function turned on?
Some refrigerators are equipped with a “Showroom” or “Demo” mode feature. This mode is used when the refrigerator is on display in a retail store or if you want to turn the cooling off and deactivates all other functions except interior lighting). Showroom mode can be used when going on vacation, see “Vacation and Moving Care” section for proper steps on leaving your refrigerator in this mode for long periods of time.
Are the controls set correctly for the surrounding conditions?
Temperature controls are preset at the factory to the “mid setting” which should be correct for normal household use. The controls are set correctly when beverages are as cold as you would like.
If you need to adjust the temperature, wait at least 24 hours between adjustments and then recheck the temperature.
To make the Refrigerator colder, adjust the control to the next higher setting. To make the Refrigerator less cold, adjust the control to the next lower setting.
Repeat this process until the desired temperature is reached
NOTE: Since control panels vary by refrigerator type, please see your Use & Care Guide for specific information on your model. Below are some examples.


If you would like to download or view product literature for your appliance, please visit our Manuals and Literature page.
Does your water filter need to be replaced?
A clogged or incorrectly installed water filter will reduce the water flow to the ice maker and dispenser, which will result in small ice cubes, low ice production or decreased water flow. If the refrigerator has a water dispenser, check for a problem with the filter by doing the following:
Dispense water using the water dispenser and note the amount of water flow.
Remove the filter. The filter is located either in the base grille below the refrigerator compartment door or inside the refrigerator compartment.
Dispense water with the filter removed. If the water flow noticeably increases, the filter is either clogged or incorrectly installed. A clogged filter will need to be replaced in order to correct the low flow.
If the filter is clogged and you are not able to immediately replace it, leave the filter out so the water system is in bypass mode. With the filter removed, the water system will continue to operate, bypassing the filter, and the clogged filter will not cause slow water dispensing or low ice production. However, in order to have filtered water, you will need to install a new filter.
To purchase water filters, visit EveryDropWater.ca. Their filter selection tool will help you identify the right filter for your refrigerator or icemaker.
Was the water system flushed after filter installation or replacement?
Flushing the system is needed every time the filter is changed or once the refrigerator is installed to the water supply line for the first time. Air in the water system may cause dripping at the dispenser that is considered a leak or for the water to dispense slowly.
More information on how to flush the water system.
Is your water filter improperly installed?
A clogged or incorrectly installed water filter will reduce the water flow to the ice maker, which will cause small ice cubes, low ice production or water not to dispense.
Additional information on how to install your water filter.
NOTE: If your water filter is located below the crisper drawer, make sure the water filter is locked into place and the arrows are aligned.

Do you have the correct water pressure?
Hollow or small ice cubes, along with slow or no water dispensing is likely due to low water pressure.
More information on getting the correct water pressure.
Are you using a reverse-osmosis system?
Connecting a refrigerator to a reverse-osmosis system could also lower the water pressure to the refrigerator, which will result in small ice cubes, low ice production or decrease amount of water being dispensed.
More information on using a reverse-osmosis system.
Is your filter marked with our brand, or EveryDrop™
Filters with our brand or EveryDrop™ are Certified Genuine Parts. Please note that the use of of a Certified Genuine filter is recommended for maximum refrigerator performance.
To purchase water filters, visit EveryDropWater.ca. Their filter selection tool will help you identify the right filter for your refrigerator or icemaker.
If you still have questions regarding your water pressure, call a licensed, qualified plumber.
If you are having difficulties removing your water filter, follow the tips below. These tips are for removing difficult or stuck water filters. Please follow the instructions for removing your water filter, found in your Use & Care Guide, first.
Filters Located in the Base Grill


Many refrigerator water filters are located near the bottom-front of the appliance in the grille area. These grille-mounted filters generally come out and install very easily. If you feel it is stuck, it may be because you haven’t turned it the right way or are not pushing the button all the way in.
Quarter Turn Filter
To remove filter turn the water filter a quarter turn to the left. Normally, the cap will be aligned vertically.
Pull the water filter straight out.
Remove the cap (on some models).
Reminder: Make sure to place the cap on the new filter.
Watch this video on how to replace the water filter.
If the water filter is stuck
Place a piece of cloth over the water filter cap (this will help protect the cap from becoming damaged).
Using standard pliers, lock onto the water filter cap and turn the cap a quarter turn.
Unplug the refrigerator and remove the bottom grill, follow the instructions in your Installation Instructions. By removing the bottom grill it could provide you easier access to the filter cap and provide you to grasp the cap easier.
NOTE: Putting too much pressure or force on the water filter could cause it to break and or do internal damage to the water system.
Pull the water filter straight out.
Push Button Filter
Locate the button on the base grill.
Push the button all the way in till the water filter has disengaged from the filter assembly.
Remove the water filter.
Watch this video on how to replace the water filter.
If the water filter is stuck
- Press and hold the button while the water filter is ejected.
- Push on the filter and then push on on the button. The filter should disengage from the filter assembly.
- Unplug the refrigerator and remove the bottom grill, follow the instructions in your Installation Instructions. By removing the bottom grill you should have better access to the stuck filter.
- Firmly press the button, look to see if the filter has moved. If the filter has moved, firmly push the filter back in and then firmly push the button again. This will help make it easier in the future.
Reminder: Don’t forget to remove the filter cap on the end of the filter.
Filter Located Inside the Refrigerator


Door Opens Up and Pops out
Open the Water Filter Compartment Door, the door will open in an upward direction.
Once the door is completely open, pull the filter completely out.
Watch this video on how to replace the water filter.
If the water filter is stuck:
Try closing and re-opening the Water Filter Compartment Door.
Ensure the door is fully opened.
Turn off the water to the Refrigerator and purge some of the water from the water line line, using the water dispenser. Dispense several cups of water, this will release some of the water pressure in the water line. After purging the water line, try removing the water filter.
Push Button or Pull Tab
Open the Water Filter Compartment Door.
Turn the filter counterclockwise, to the left, and pull it straight out.
Watch this video on how to replace the water filter.
If the water filter is stuck:
Ensure the compartment door is open completely. Depending on how the shelves are arranged you may need to remove the shelf that is located just below the water filter compartment.
Turn the filter counterclockwise, to the left, and pull it straight out.